![]() Audacity is a free, easy to use and extremely powerful tool that enables teachers to create high quality recordings. Whether you’re wanting to create, edit or splice together a collection of recordings then this is the perfect software for you. At first glance the array of buttons, dials and plugins can seem a little overwhelming but this blog post takes you through some simple steps to help you create your first Audacity project.
Audacity is a free, easy to use and extremely powerful tool that enables teachers to create high quality recordings. Whether you’re wanting to create, edit or splice together a collection of recordings then this is the perfect software for you. At first glance the array of buttons, dials and plugins can seem a little overwhelming but this blog post takes you through some simple steps to help you create your first Audacity project.
Audacity is a open sourced piece of software that can be quickly and easily installed onto your device; it’s available for Windows, Mac and Linux. Once loaded onto your machine you’re nearly ready to make your first recording or to edit an existing audio extract.
Making a Recording
Does the device you are using have a built-in microphone?
- Yes. If you’re not fussed about the quality of your recordings e.g. they are made for students who are going to access them for revision purposes, then it is totally fine to use the in-built microphone. If you don’t have an in-built microphone or you want a better quality sound then read ‘No’ below.
- No. You may like to purchase a USB microphone. These are available in a range of styles (and costs!) but the most important consideration is that it comes with a stand. Without a stand the sound quality may be impaired. You will not be able to make any recordings without either a USB microphone or an in-built microphone. You can, however, still edit recordings made by others.
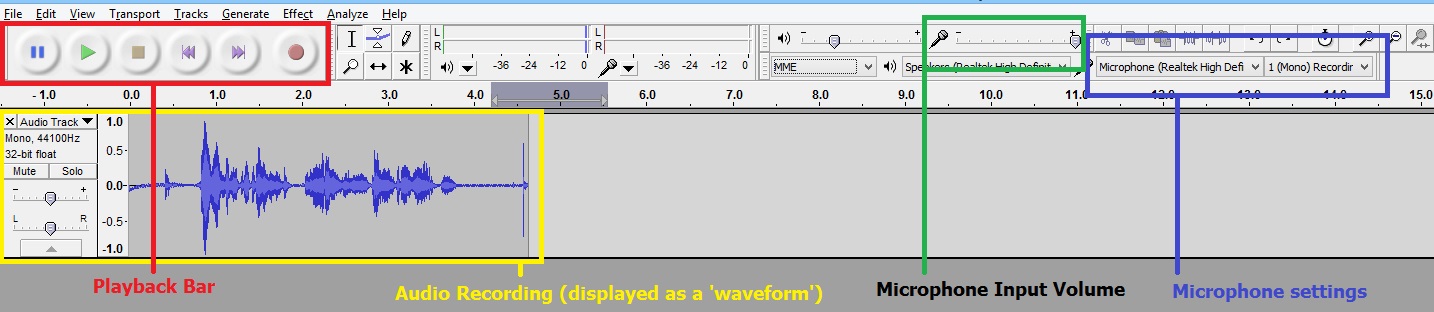
The image below (click to enlarge) shows what the Audacity will look like when you first open it. The exception to this is the contents of the yellow box; the ‘waveform’ will only appear once you start to make a recording.
To get going you will need to do the following:
- In the microphone settings (the purple box) ensure that the microphone you are using is selected by using the dropdown list on the left-hand box. This should be, by default, the name of your in-built microphone but you may need to change the selected microphone if you have more than one microphone or if you are using a USB microphone. Change the second box dropdown to mono (only with two, or more, microphones can you make a stereo recording).
- Make sure that the microphone input volume (see the green box) is high. Move it to the right to increase the input volume. If you find, once you start recording, it is too loud or too low, use this setting to make changes.
- On the playback bar (see the red box) there is a record button, the red dot, press this and start talking (count to 10 if you’ve got nothing to say!). If you’ve got everything set-up properly you’ll see a waveform appear as you start to talk. Ideally you’ll want the waveform to have clearly visible peaks and troughs like in my example above (if not, see troubleshooting below).
- Press stop (the yellow square on the playback bar) to end the recording.
Troubleshooting
- If the peaks and troughs are barely visible and you see just a small purple line being created as you speak, then it’s likely that your microphone input volume is too low. Drag the microphone input slider (see green box above) to the right increase the input.
- If you see a mass of purple being created as you speak then your microphone input volume is too high. Drag the microphone input slider (see green box above) to the left to reduce the input.
- No waveform appears as you speak. Either you have not connected and set-up your USB microphone properly or you have not selected the correct input from the microphone settings (see purple box above). Try changing the settings and re-record.
Exporting Recordings. It’s very tempting to select ‘save’ when you’ve made a recording – don’t! By pressing save you are only saving the Audacity file which contains the recording. To extract the recording from Audacity you need to: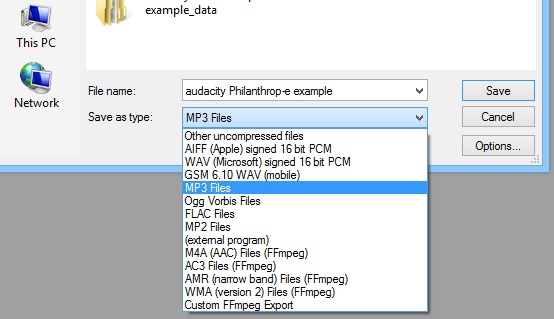
- Go to File
- Select Export Audio
- Select where you wish to save the file and what you would like to call the file
- Using the ‘Save as Type’ dropdown menu (see image) choose which format you would like to save the file. Unless you are familiar with these different formats I strongly suggest you choose MP3 as this is the most commonly used format for sharing files. They are also fairly small in ‘size’ which means you can email them to students and/or embed them into a webpage.
- The first time you try to save as MP3 you will be told that this is not possible as there is missing software – this is normal and nothing to worry about. Click on the download button and follow the steps. Once you’ve downloaded and installed the ‘LAME’ encoder on your device, you can then save to MP3 whenever you need to.
Top Tips for a Good Recording
- Switch off your mobile phone. Not just because it may ring but microphones can sometimes pick up signals as the phone periodically reports its position to the nearest cellular mast.
- Record in as quiet environment as possible. Your listeners don’t want to hear distracting background noises like children shouting, cars outside etc.
- Smile when recording. A patronising statement admittedly but it makes such a difference. Smiling while recording does give your audio a ‘lift’.
- Don’t just accept the first recording you make, listen to it and re-record if necessary.
- Remove any ‘dead’ sound at the start and end of your recording (see editing recordings below).
Editing Recordings. Editing in Audacity is very easy. Have a look at this image:
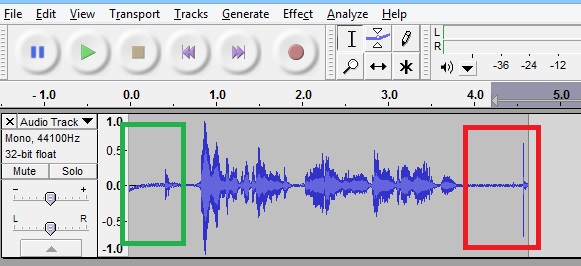
- The green box contains the silence before I start speaking. There is also a slight peak which is when I draw breathe.
- The red box has a lot of silence and a peak right at the very end. My microphone managed to recording me clicking the ‘stop’ button on the playback bar.
Let’s assume that I wish to delete these silences and unnecessary peaks.
- Using my mouse, I would left click and drag to highlight the area in the red box.
- I then press delete. This section has been removed.
- I repeat this process for the area in the green box.
Removing unwanted sound is extremely simple in Audacity.
Other Functions I have only covered two of the most basic functions of Audacity: Record and Edit. This fantastic piece of software has so many other functions, some for the beginner and some which require a little more patience and skill. If you are interested in exploring some of the features:
- Make a recording
- Highlight some of the recording
- Go to Effect (which is found above the playback bar)
- From the dropdown list that appears make a selection and see what happens. If you don’t like what has changed then just undo (CTRL+Z on Windows) to revert the recording to its previous state.
My top effects:
- Change Pitch. Useful if you wish to disguise your voice.
- Fade In (and Fade Out). Very useful if you are recording in a noisy environment. Rather than the recording starting/ending abruptly (which can be rather deafening if using headphones) this function gently fades in/out your recording.
- Equalization. Just like those 1980s stereo systems. This is very useful – a small change can amplify the bass, treble or mid-range improving the audio experience of your recording.
- Reverb. This takes a little bit of time and patience but gentle application of Reverb can make a ‘dry’ recording sound a little more pleasing to the ear.
What do you think? If you have used Audacity and have any experiences to share why not ‘join the discussion’ below. I’d love to hear from you.
 Currently the Head of e‑Learning and a teacher of Music and Computing at a large school in