This is where it began for me. I was bored with repeating the same set of instructions every time a new student joined my weekly music theory club. I came up with the crafty idea that someone can’t join the club until they’ve watched a video explaining some pretty fundamental information. As it happens, my students loved the fact that their first piece of homework was to watch a video! And that’s where it started, converting some PowerPoint slides into a video which the students could watch at home.
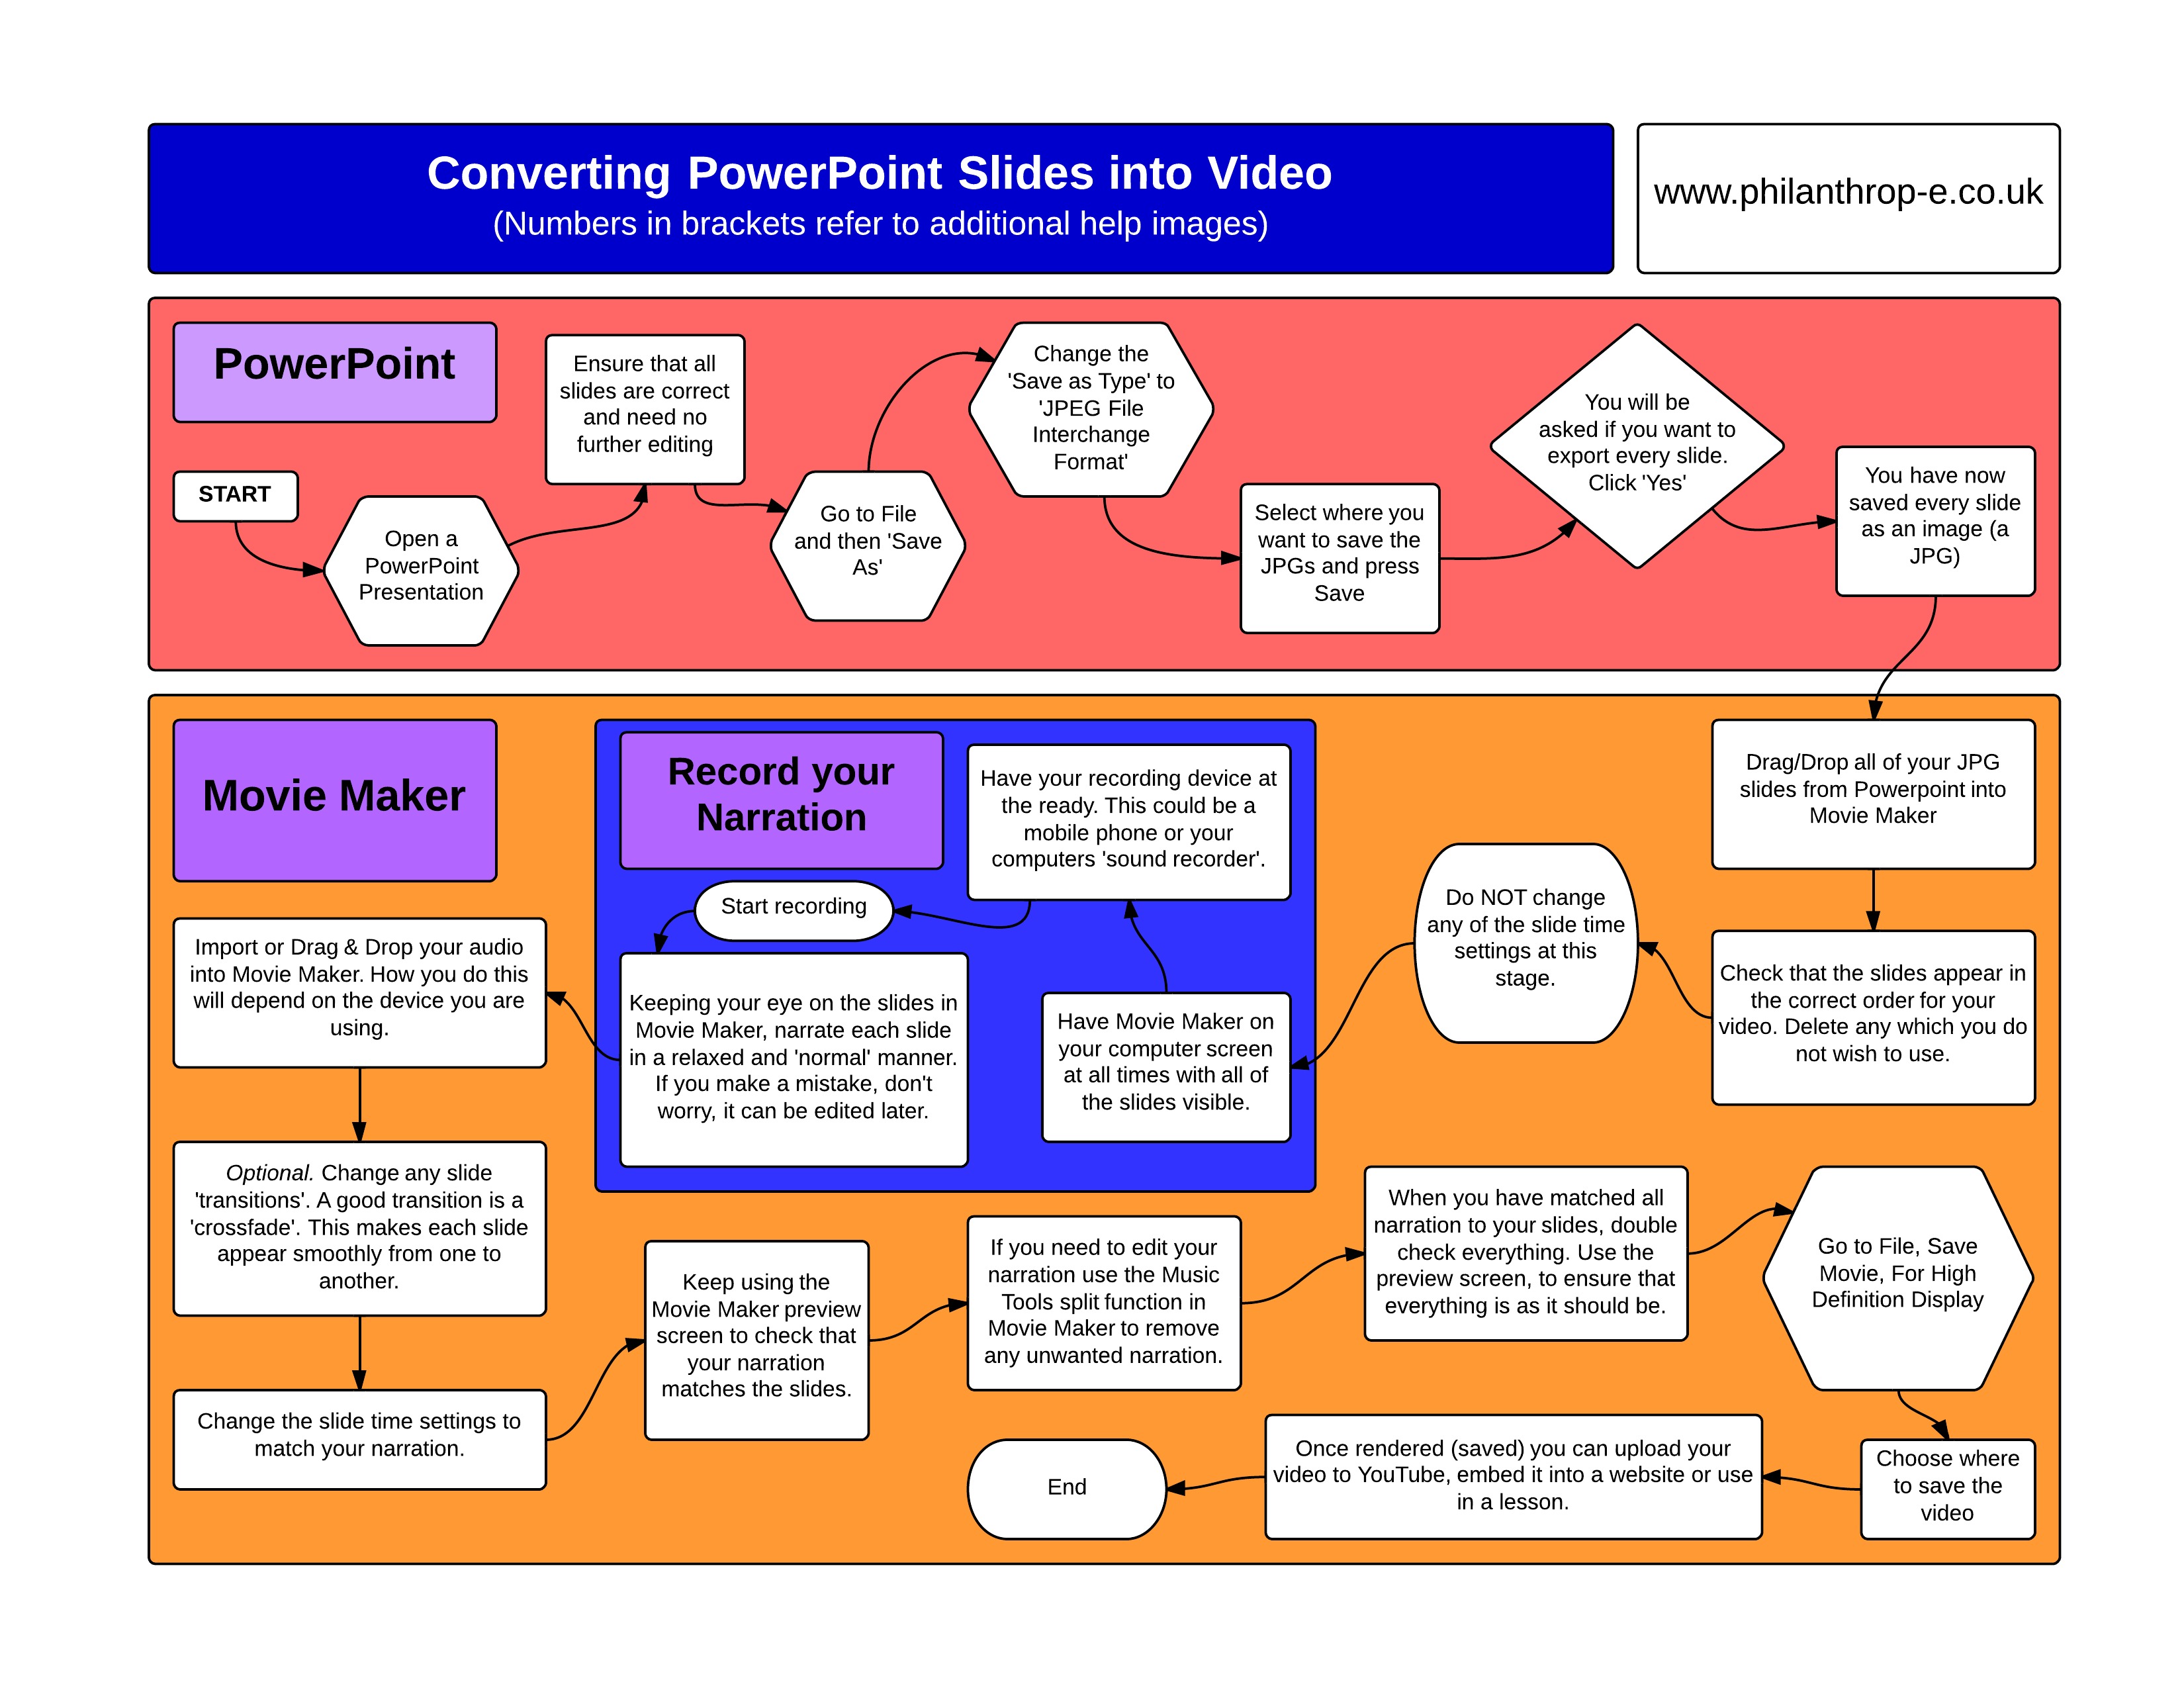 It might seem complicated and time consuming but, trust me, once you’ve got the hang of this you’ll find it quite addictive. I showed this to a group of teachers a few months ago and they loved this idea. So, hold onto your hat, let’s take this step by step. If you’re feeling brave, and wish to bypass the instructions below, click on the flow chart which goes through the instructions in a clear single sheet.
1. Open a PowerPoint Presentation
That’s the easy bit.
2. Export each PowerPoint Slide as a JPG
- Make sure that you do not need to make any further changes to your slides
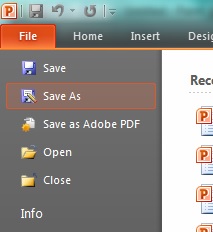
- Go to File, Save As (see image 1 below)
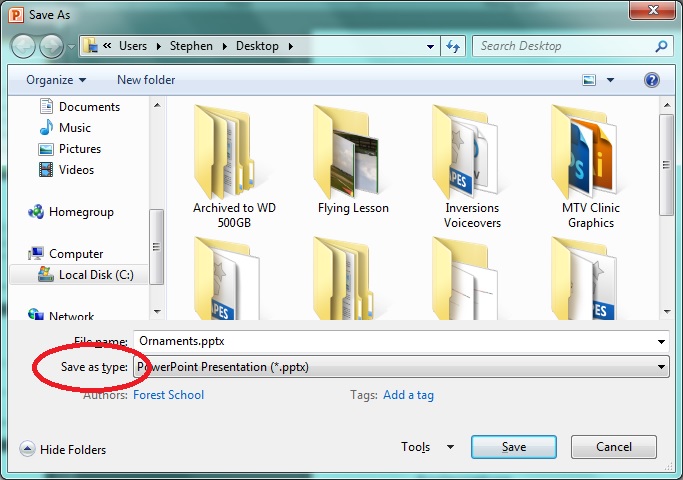
- Change the type to JPG (see image 2 below). Use the drop down list to locate JPG or JPEG
- Name your JPG’s e.g. ‘Slides for Biology Video’ and press save once you’ve chosen a location to save the files
- You will be asked whether you want to save all the slides as JPG or just one of them. Choose All.
- You can now close PowerPoint.
| Image 1 | Image 2 |
 |
 |
3. Open Windows Movie Maker (or iMovie if you’re using a Mac)
I personally use Windows Movie Maker, a great free piece of software that comes bundled with copies of Windows. If you’re running a Mac you can use iMovie as an alternative. The instructions I provide from this point forward all refer to Windows Movie Maker but the process of creating videos from PowerPoint are exactly the same regardless of the software that you use.
- Drag & Drop all of the JPGs you created from PowerPoint into Windows Movie Maker (see image 3 below)
- The drag & drop process should mean that the slides are imported in the order in which they were created in PowerPoint. However, it’s worth just double checking that this is indeed the case. Just slide them around the screen to where they should be located if this is not the case.
| Image 3 |
 |
4. Record the Narration
There’s a number of ways you can record the narration:
- Using your laptop or computer. Most have an in-built microphone which you can utilise. Search for ‘Sound Recorder’ if you run Windows. Okay, the sound quality is not going to be Hollywood standard but it’s absolutely fine to use for your video.
- Using an external microphone plugged into your computer. This could be a headset you use for Skype/webcamming or a USB microphone which you can buy. You might want to use Audacity, another handy and free piece of kit, to record your narration.
- Using your mobile phone or tablet.
This is what you need to do:
- Ensure that you have Windows Movie Maker on the screen as you narrate.
- If you make mistakes or leave lots of silence, don’t worry, you can edit these out later.
- Try to smile when you narrate – a very patronising suggestion, but it really will make your voice sound much more welcoming and friendly in the video.
- Using a free hand, scroll between the slides in Windows Movie Maker as you narrate. This will help you know what, and in what order, to narrate your content.
- If it helps, have a aide memoir, not a full script, to hand before you start. A fully scripted video will sound rather dull.
- Make sure you save your narration.
5. Import & Edit the Narration
How you import your narration will depend on how you recorded it:
- If you recorded the audio on a mobile phone/tablet you should be able to email it to yourself or transfer it, via USB, when plugged into your computer.
- If you used Audacity or Sound Recorder, make sure you saved your narration somewhere accessible on your computer.
When you’ve located the file(s) you:
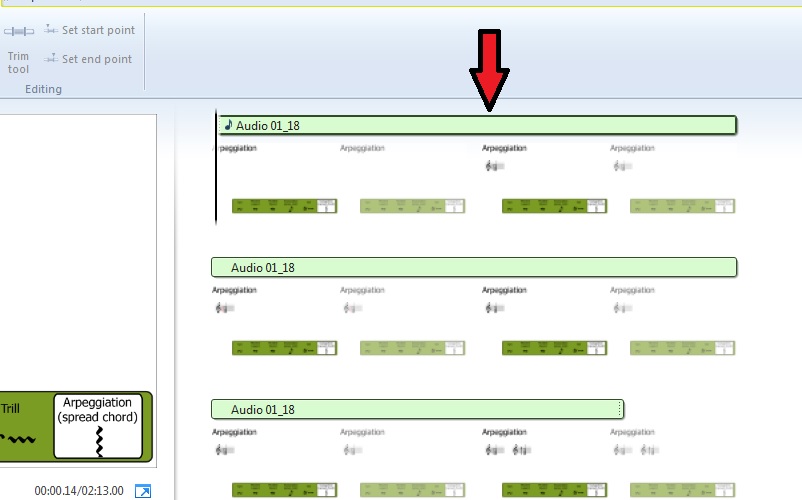
- Drag and drop them into Windows Movie Maker. You’ll see that a green bar appears above the slides to represent the audio (see image 4 below).
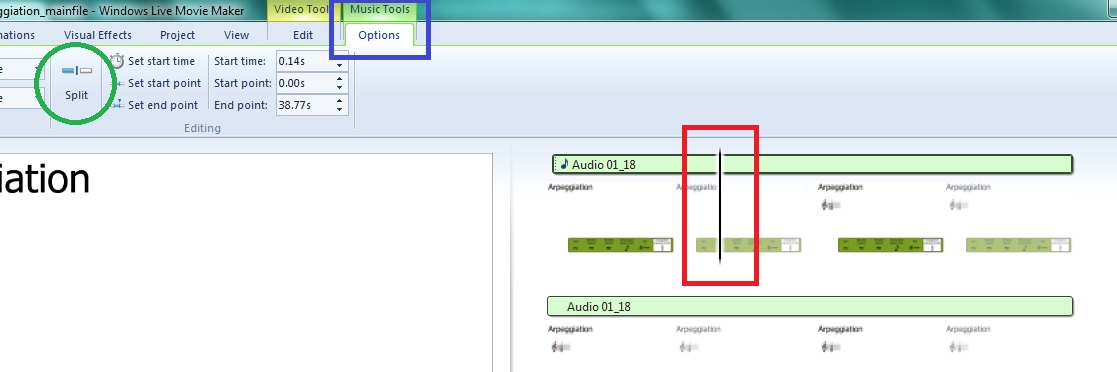
- If you need to edit or cut parts of the audio (let’s say you want to remove some silence):
- Select, by clicking, on the audio file you wish to edit
- Drag the timeline bar to where the silence begins (see image 5 – red rectangle)
- Go to Music Tools, Options (image 5 – blue rectangle) and select split (image 5 – green circle).
- Drag the timeline bar to where the silence ends and select split from Music Tools.
- You can now select the cut-out silence with your mouse and then press delete. The silence will now be removed.
- Repeat this process for as much of the narration you need to remove.
| Image 4 (click to zoom) | Image 5 (click to zoom) |
 |
 |
6. Add Slide Transitions (Optional)
At the moment your slides will pop up on screen one after the other once you press play. I personally like slides to move smoothly, blending each slides content seamlessly into the next. To do this:
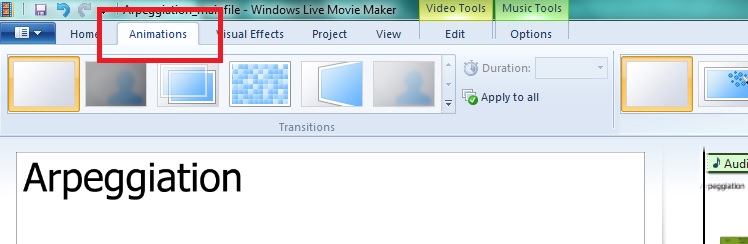
- Press CTRL+A to select all of the slides
- Go to Animations (see image 6 below)
- If you hover your mouse over your animation selection Windows Movie Maker will show you a preview. I personally like ‘crossfade’
- Once you’ve made your choice click the transition and it’ll be applied to all of your slides.
| Image 6 (click to zoom) |
 |
7. Match the Slides to the Narration
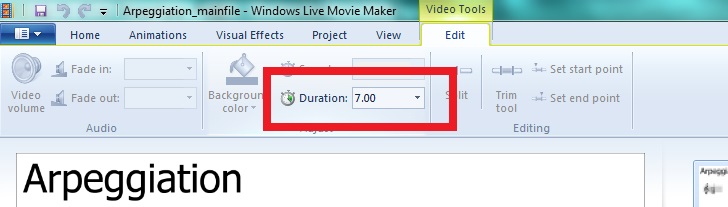
You can now start varying the time length of each slide so that it fits your narration. At some point you’ll want the first slide to move to the next at the same time your narration says something like “as you can see, from this next slide, I have listed…” . All you need to do is change the ‘duration’ of the each slides. Some slides may appear for a few moments whereas others need much longer. To adjust the duration of each slide:
- Go to Video Tools (see image 7 below)
- Make sure that you have selected, by clicking on it on from the right hand side of the screen (see image 3 above)
- Change the ‘Duration’ (see image 8 below). The value is in seconds.
- Preview your changes by (see image 8 below):
- clicking the play button underneath the preview screen (in red square in image 8)
- By dragging the playback bar (in red oval in image 8)
- Keep repeating for each slide.
| Image 7 (click to zoom) | Image 8 | Image 9 (click to zoom) |
| |
 |
 |
8. Export the Video File
I see a lot of instances where this stage is ignored. Miss it at your peril; it’s no good emailing yourself the Windows Movie Maker or iMovie file so you can watch the video on another PC, it’s likely not to work.
This stage of the process pulls together all aspects of your video (slides, narration, transitions) and binds them all together to create one single video file. You can then transfer the file between computers or even upload to video sharing sites like YouTube. In Windows Movie Maker:
- Go to File
- Save Movie
- For High Definition Display
- Choose a file name and location
- Click Save
- The file will take what seems like a lifetime to save; welcome to the slow world of rendering.
9. Proudly Show your Video to Others!
Now that your video has rendered you can now:
- Email the file (assuming it is not too big)
- Transfer it between different PCs/Users
- Upload to video sharing websites such as YouTube
 Currently the Head of e‑Learning and a teacher of Music and Computing at a large school in