 Are you thinking of using OneNote in the classroom for the first time? If so, excellent! It’s a fabulous piece of software which has the potential to revolutionize the way students access, store, annotate and develop their work and ideas. I’ve gushed about OneNote on this blog previously stating that “OneNote has completely revolutionised how I work“. I still stand by these words and having used OneNote successfully for the past year, I recently introduced the software into my classes. It’s been a bumpy ride and there have been moments when I honestly felt like taking a hammer to several personal devices. I’m here to share my experiences and give you a few tips on how to get the best out of OneNote if you’re using, or planning on using, OneNote in the classroom for the first time.
I’m going to assume that as you’re reading this blog, you’re already familiar with OneNote and what it can do. If not, take a look at the official OneNote webpage where you can learn about OneNote, its functions and, many, uses.
Promote. Most students will have never used OneNote, let alone heard of it. Make sure that they’ve seen it demonstrated and explain to them why and how you plan to use OneNote in the classroom. Start simple and don’t be overly ambitious in your plans. Explain that it is merely another tool, like a calculator for maths, but can be accessed by both the student and teacher at the same time. I found that the analogy of a virtual exercise book which cannot get lost, damaged or even eaten by the family dog, was a good way to sell it; particularly to parents. Ideally, get a few like-minded colleagues to trial the software with a handful of their classes as well. Share your experiences and don’t be afraid to admit if things didn’t quite go to plan.
 Create. If your school is running Office 365 then you have a head start in quickly and easily setting up notebooks for pupils in your classes. The OneNote Classroom Creator is exceptionally easy to use and you’ll have files ready for your students in a jiffy. The tool creates:
- A OneNote file for each student in your class. Both you and the student can access, read, amend and update the content. Students do not have access to each others OneNote files.
- A collaboration space. This is a superb tool and allows students to share ideas. As a music teacher, I’ve already got my students working in small composition groups and they can share ideas with their group members. Other students can also see what the other groups are up to and, hopefully, inspire their own compositions.
- A content library. Only the teacher(s) can place items in this area. Think of it like a filing cabinet, the teacher puts a document, audio file, video etc. into the content library and the students can copy it into their own OneNote for use at home or in the lesson. No more lost worksheets!
Love your IT Team. Most schools have a superb IT team but do let them know what you are planning. It’s possible that they’ve never used OneNote so if you can brief them on your intentions, they can help any students that may head their way.
Explore & Set-up. Before you even use OneNote in the classroom, make sure that students have downloaded and set-up OneNote. I’ve spent too much time having to retrospectively help students understand how to download, set-up and sync their OneNote software with their OneNote files. Perhaps take an entire lesson to ensure that students know how to access their work, type/draw into OneNote and how to move pages from the Content Library into their own area. Basic stuff, but essential skills if you are going embrace OneNote in the classroom.
But most importantly, and I cannot emphasise this enough, make sure students download the correct version and that you know the limitations of each version…
OneNote is not the same on all devices. The biggest problem I’ve had with OneNote is that there are different versions available for different devices. To make matters worse, the ‘full version’ (known currently as OneNote 2013) is different on a Windows device when compared to the version on a Mac. The latter has some potentially serious deficiencies when compared to OneNote 2013 for Windows. The following table gives an overview of which version to use when you are using OneNote in the classroom:
| Device Operating System | |||||
| Windows | MacBook | iPad | Chromebook | Android | |
| OneNote 2013 | Best | Best | N/A | N/A | N/A |
| OneNote App | Avoid | Avoid | Best | N/A | Avoid |
| Web Version | OK | OK | OK | Best | Best |
The Differences. All of the images below (click to enlarge) are from the same OneNote file viewed on different versions of OneNote. For safeguarding purposes, the names of students have been covered by a red rectangle. The green rectangle shows the location of the OneNote pages within the file. As you’ll see, they are located and presented differently in each version.
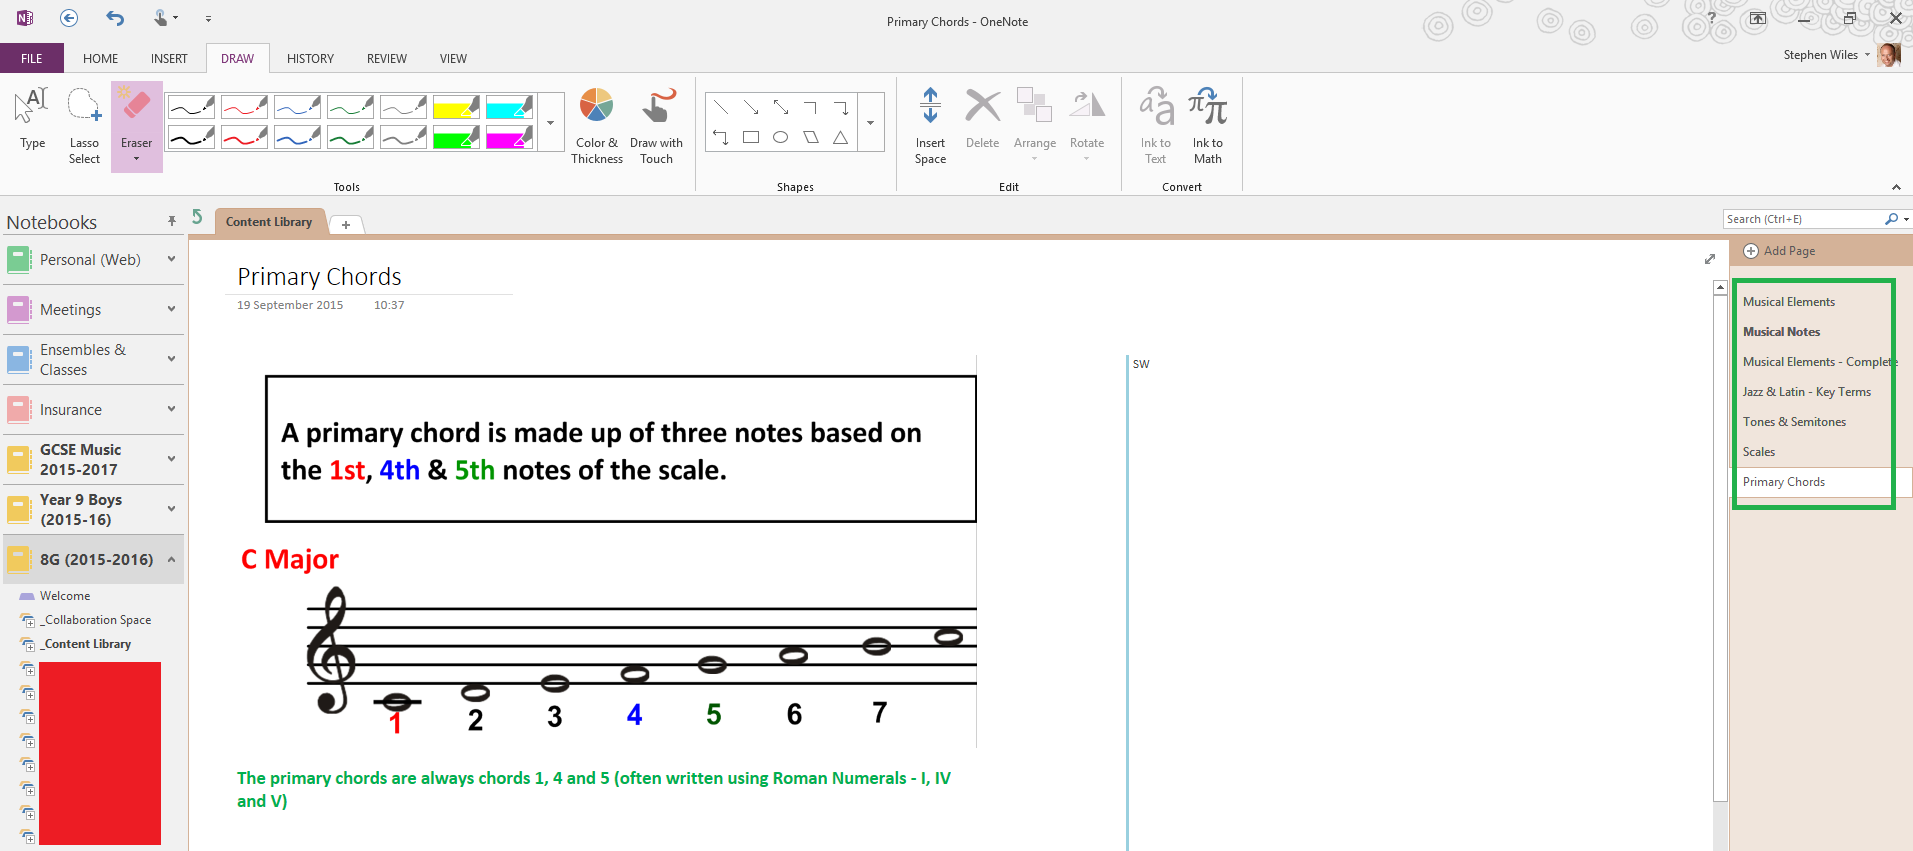 OneNote 2013. If the student is using Windows or a MacBook then this version, the full version, is a must. It has a familiar Windows look & feel and it also has the widest selection of tools to use. The Mac version, however, does not have a draw facility. I came across this just as I wanted the students to draw a musical scale onto a stave (those 5 lines on which music notes sit). Windows users had this task licked in seconds. Mac users were left pulling their hair out. On the positive side, this version is available offline meaning that students can work on their OneNote (perhaps write an essay or annotate some other work) even when a wi-fi signal is unavailable. For the successful implementation of OneNote in the classroom, use this version.
 OneNote App (except iPad). Treat this app as a viewing tool and nothing more. It’s great if you just want a quick peek at a OneNote file or to make some small change. However, it is not fit for purpose when it comes to OneNote in the classroom. The biggest drawback is that students cannot copy pages from the Content Library into their personal OneNote file. This is a major flaw and has left my students scratching their heads and frustrated by their inability to complete all tasks that I have set. When you are helping students set-up OneNote on their device make sure that they have the full version or that they are using the web version rather than the app. I’ve found that students simply don’t realise that they have downloaded the app (which, to add further confusion, is already installed on Windows 8.1/Windows 10 by default) rather than the free OneNote 2013. This is where your initial training and helping students set-up OneNote on their device is key.
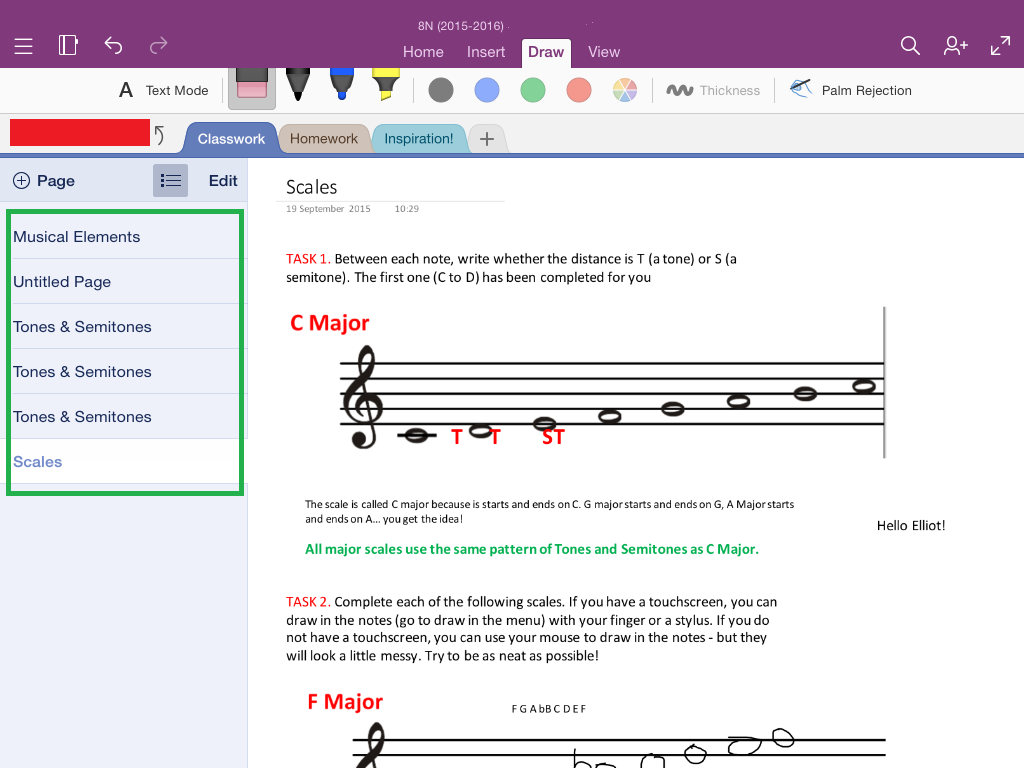 OneNote for iPad. If you own an iPad then this is the version that you need. Not quite as good as the full version but better than the web version. The app, like any app, has it’s limitations but the handy drawing tool is available for iPad, unlike on a MacBook. This facility is especially handy if used in conjunction with a stylus. It’s worth getting to know this version as there are some idiosyncrasies. For example, when in draw ‘mode’ you cannot zoom in and out with the familiar two finger pinch across the screen. You need to switch off draw mode before you can do this. There is also a useful ‘palm rejection’ tool which means you can lean on the iPad and draw/write at the same time. It’s not perfect but it allows you to write in a more natural way than is usually possible with a stylus. I would also recommend that a physical keyboard is used rather than the on-screen keyboard. The on-screen keyboard takes up most of the screen space leaving you with very little space to see and use the OneNote file.
 Web Version. This version is acceptable if OneNote 2013 is not available. Chromebooks and others tablets fall into this category but be aware that it doesn’t have the full set of tools that’d you’d like. Draw is not available and the copying of multiple pages from the Content Library is not possible. As it’s web based it clearly going to be slower than a piece of software installed in a device. Therefore, you need to build time into your lessons to allow the Web Version users to catch-up with those using OneNote 2013. If you do catch a student using the web version when they should be using the full version, get them to press Open in OneNote (circled in blue in the screenshot) but make sure that the full version opens and not the app. This is where you can get into the murky world of default apps on Windows devices. You may need your IT team on hand to assist.
And finally: Students like to delete. Imagine you’ve just left some very helpful feedback for the students in their OneNote. All it takes is for the student to accidentally (or even maliciously) press delete and all of your precious and individualised marking/comments have disappeared. Don’t panic! There is a roll back function allowing you to restore previous versions of the page. Personally, I’d like to see a ‘lock teacher comments’ button which would prevent this from happening in the first place. If Windows/OneNote HQ are listening – I’d love to see this in the next version of OneNote.
Don’t be put off by the long list of instructions above. Just remember the first time you ever used something that you’re now fully familiar with. I recall, in 1994, asking someone how to spell ‘curriculum’ as I tried to put together a Word for the very first time. I was astounded when told that the software had a spellcheck function. Every new function in Word confused me and I was convinced that I’d never understand how it worked. Of course, I now use Word without any problem every day. OneNote is the same. At first, I wondered how I would get the best out of it but it is an awesome tool that I now use all day, every day.
 It’s been four weeks since I started using OneNote in the classroom and while there have been headaches and tantrums (from me, not the students!) I know that OneNote is going to massively shift the focus, direction and effectiveness of both my teaching and, most importantly, the students learning. It has been hard getting the students to move from the familiar exercise book that they’ve become so accustomed to. As educators, we need to be preparing students for the world of tomorrow and that world will include the use of collaboration software such as OneNote. If you’re not already using OneNote in the classroom, now is the time to make the switch. Just a little bit of pre-planning and familiarization with the different versions will help you ensure that this transition is as smooth as possible.
Good luck!
 Currently the Head of e‑Learning and a teacher of Music and Computing at a large school in